
This is post two in my series about the Data API Builder (dab), the first post, Data API Builder, covers what dab is and how to test it locally against SQL Server in running in a container. This was great for testing, but now we want to start to productionise this, and the first step is to get it running somewhere other than my laptop.
There are several deployment options available, I recommend you review the Microsoft docs here: Deployment guidance for Data API builder.
In this post I’m going to show you how to get it running in an Azure Container Instance, this is a cheap and cheerful way of getting this into the cloud. If you need more features like auto-scaling and better monitoring take a look at Azure Container Apps instead, the deployment process is very similar to what we’ll walk through in this blog.
Connect to Azure
First step is to get connected to Azure, I’m going to use the Azure CLI for this post, you can install it locally, or use it within Azure Cloud Shell.
If you are running it locally, go ahead and run the following to connect and do the auth dance so your session is authenticated with the appropriate subscription that you aim to deploy resources to.
| |
You can also check which account your sessions is currently using:
| |
Azure SQL Database
We’re going to build on what we created in the first post, and instead of running against a local SQL Server instance we’ll use an Azure SQL Database. You can deploy a free Azure SQL Database with the Azure CLI as shown below.
First, let’s setup some variables - feel free to customise these, and we need a resource group, just a logical container to keep our Azure resources in.
| |
Next up, create the Azure SQL Server. One thing to note here is that I’m specifying an admin user and password, which will create a SQL Login, as well as an external admin. In Entra I have created a group called SQLAdmin, and added my account to that group, then I can use this group to become admins to my SQL Server.
You don’t have to specify an external Entra admin to create an Azure SQL Server, but for this setup we need to be able to connect with Entra auth later to add permissions for our managed identity. If you don’t want to use a group, you can also just use your Entra account.
| |
Finally, we’ll create an Azure SQL Database, using the AdventureWorksLT sample on that Azure SQL Server. You’ll notice I have specified to use my free limit and if I run out, pause, rather than start charging me with the --use-free-limit --free-limit-exhaustion-behavior AutoPause parameters.
| |
Once that completes, you’ll be able to see your database in the Azure Portal, and note your connection string as we’ll need that shortly.

We also need to add a networking rule to allow Azure services to connect, this means our container app can access the Azure SQL database.
| |
DAB Config
Now we have a database in the cloud to connect to we can set up our dab-config.json. In the previous post when we were testing locally we connected to a local docker container, with a hardcoded password. This time we will replace our connection string with an environment variable and then we’ll configure the container instance to pass that in.
To create the dab-config.json you can run the following code, this will create the config with all the defaults for a SQL Server, but it’ll set the connection string ready for our environment variable.
| |
💡 Note: host-mode I’ve set this to
developmentwhich enables swagger among other features, review the docs here to determine which mode is right for you Mode (Host runtime)
Next we’ll add the entities we want to expose from the database, if you want to add all the database tables, you can use dbatools to grab a list of tables and then loop through them running dab add for each entity.
| |
🔒 Note: Firewall Access
If you get a connection error about your IP address not being allowed, you’ll need to add a firewall rule for your current IP, you can do that using the az cli:
1 2 3 4 5 6 7$ipAddress = (iwr https://icanhazip.com/).content.Trim() az sql server firewall-rule create ` --resource-group $resourceGroup ` --server $server ` --name "MyDevMachine" ` --start-ip-address $ipAddress ` --end-ip-address $ipAddressThe firewall change typically takes effect within a few minutes.
If you view your dab-config.json file, you should see lots of entities that have been added.
Config Storage
Alright, now the dab-config.json is ready we need to store it somewhere, and the easiest option here is a file share in Azure. Let’s create a storage account and a file share in the same resource group we created earlier. Remember that your storage account name has to be lowercase and globally unique.
| |
Now the share is in place we can upload the dab-config.json that we created earlier. You can use the Azure CLI to upload this file, first grab the account key, and then use az storage file upload to place the config file in Azure.
| |
Azure Container Instance
With the config in place, now we will focus on creating our Azure Container Instance and wiring it up to use the config. When we created the dab-config.json file we set the connection string to an environment variable called DATABASE_CONNECTION_STRING so we need to populate this with the connection string to the Azure SQL Database that we created earlier.
| |
There are a lot of parameters for this step, most of them should be fairly straightforward as they are defining the environment, what sku, what operating system, and the resources available. Next we add the environment variable so the container knows where the Azure SQL Database is. Then we mount the Azure File share so the container has our dab-config.json file available.
The final parameter I’ve added is --assign-identity which adds a managed identity for the container instance, with this we can provision access to the Azure SQL Database. At this point though, the container is unable to start because it doesn’t have access to the database, but we can’t add the access until we have the managed identity created.
Managed Identities are super cool, you can enable them for most of your Azure resources, and then give those resources access to other Azure resources with no passwords to manage. I highly recommend if you aren’t using these already you look into them.
Database Access
The next step is to give the container app access to the Azure SQL Database. We can use dbatools to create the user and add the permissions. The username for Managed Identities is the name of the Azure resource, so in this case ci-dab-prod-001, which is the name of the container instance.
| |
But you can’t create Entra\AD accounts with a sql login…
| |
Which is why I added the external Entra admin, we need to connect to Azure using Entra auth, grab a token, and then we can use that with dbatools to execute the query.
| |
Now the container can auth to the database, let’s restart the container instance, and this time it should have everything in place to start in a healthy state.
| |
Test the API
To get the FQDN (fully qualified domain name) of your container, you can again use the Az CLI. This will be the endpoint of your API, and by default it’ll be listening on port 5000.
| |
Mine is http://ci-dab-prod-001.uksouth.azurecontainer.io:5000/, when you navigate to this you should see that the service is running, and healthy.

The same as when we were running dab locally, we can view the swagger documentation at http://ci-dab-prod-001.uksouth.azurecontainer.io:5000/swagger
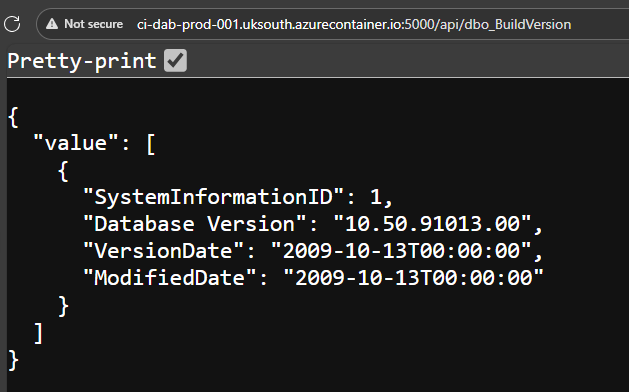
Then we can hit our API endpoints and interact with the data within our Azure SQL Database. For example, I added an entity called dbo_BuildVersion that references the dbo.BuildVersion table so I can view the data in the browser at http://ci-dab-prod-001.uksouth.azurecontainer.io:5000/api/dbo_BuildVersion.
But who wants to just hit APIs in a browser… We of course can also use PowerShell.
| |
The data is returned, and can now be used as a PowerShell object, for whatever you might need. Super cool.

One Problem
Anyone spot the problem?
Right now there is zero authentication required to hit my API endpoints. If you review the permissions for each entity we added to the dab-config.json file, they are all set to anonymous and the action is set to ‘read’. This means, anyone can GET my data from my Azure SQL Database.
When I added the entities to dab, I did at least only allow read access. This is great for public data, but not for company data, and not if we want to PUT, PATCH or DELETE using the API.
| |
Tidy Up
If you’ve been following along you can tidy up and remove the whole resource group with the following command
| |
Up Next
As I mentioned this is part of a series on dab, and hopefully you can guess what the next post might cover. Authentication - and how we can use these dab endpoints with Azure authentication, coming soon!
dab Blog Series
Here are all the links to the dab blog series:
- Data API Builder
- Running dab in an Azure Container Instance
- More coming soon…
Or you can view all posts about dab using the dab category.